You know the Christmas Stockings filled with chocolates or lollies that you find in the shops at Christmas time? Well, several years ago I found a pattern for a paper Christmas Stocking online and so I made one for each of my children for Christmas. Ever since then, instead of buying over-priced chocolate Christmas stockings each year, I fill these with small packaged lollies (candy), lolly pops, wrapped chocolates, or similar lollies. These stockings can also be used to hold other goodies, such as small gifts, or gift cards.
TIP: If what you are adding inside the stocking is too small and the stocking is too long/tall, you can put a piece of scrunched up tissue paper down into the toe section, which elevates whatever you add to the stocking.
 |
| Christmas Stocking with Designer Series Paper |
For this stocking I used a 12" x 12" piece of Season of Green & Gold Designer Series Paper, with the reverse side of the paper for the heel and toe.
I also used some off cuts of Very Vanilla for the tags and Old Olive with Gold Foil for the pine leaves. The bells were die cut from the Season of Green & Gold Designer Series Paper.
To punch the holes for threading the gold ribbon, I used the retired Stampin' Up!® 1/8" hole punch. Full supply list can be found below.
 |
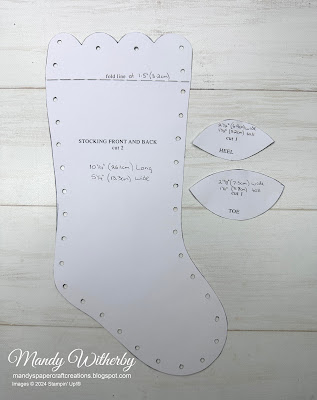
| Christmas Stocking Template - click HERE to download PDF template |
Full product list for my card and direct shopping link can be found HERE.
Instructions
- Trace and cut out stocking front. Be sure to trace the holes as well. Flip template over and trace and cut in the reverse to make the back of the stocking. Punch out all holes.
- Score stocking cuff using a ruler, stylus and Stamp 'n Pierce Mat. Fold cuff forward to reveal the reverse side of paper.
- Trace and cut out 2 heel and toe pieces from reverse side of Designer Series Paper.
- Using coordinating ink and a Sponge Dauber, sponge ink around heel and toe, as well as the reverse side of the scalloped top of the stocking.
- Adhere the heel and toe pieces to the front and back of the stocking using Multipurpose Liquid Glue and trim any overhang.
- Punch holes from reverse side of the heel and toe, once secured in place.
- Apply a few short pieces of Tear & Tape or Multipurpose Liquid Glue between some of the holes to secure the front and back stocking pieces together, until bound with ribbon. Re-punch any holes that may not have aligned.
- Thread a piece of ribbon through the two centre holes on the cuff and form a bow in the centre.
- Starting at top left of stocking, thread 60" (152cm) of ribbon through punched holes, leaving 16" (40.5cm) ribbon at each end. When you get all the way around take the piece from the top right and thread decorated tag onto ribbon, then take the end of the ribbon and thread ribbon back through top left hole, bringing back around to the front to tie a bow at top left corner.
- Add tags and die cut bells to the long tails of ribbon hanging down left side. Trim ribbon to desired length. TIP: Apply a Mini Glue Dot to the back of the bells and tag and press the ribbon to Glue Dot to hold in place. This also helps the ribbon to sit flat against tags.
- Die cut two pine needles from Old Olive Cardstock and one from Gold Foil Sheet using Golden Greenery Dies. Using Sponge Dauber apply Old Olive ink to the edges of the Old Olive pine needles and assemble cluster of pine needles. Adhere cluster just under edge of the cuff using Mini Glue Dots or Tear & Tape so that cuff still sits flat. Apply Mini Stampin' Dimensionals down the centre of the pine needle to lift them and add dimension.
- Add embellishments.
If you would like to see how I created this Christmas Stocking, you can click on my video below.
I hope my project has inspired you in your creativity and encouraged you to consider creating one of these Christmas Stockings using your favourite Designer Series Paper.
*** When shopping with me, remember to use my current Host Code when your order is over $75 AUD, to receive a thank you gift from me. You will find my current Host Code at the top right side of my blog page.
DECEMBER 2024 Host Code is QN2RG9T6
If your order is over $250 AUD, don't use the Host Code, as you will receive Stampin’ Rewards from Stampin' Up!®. Be sure to claim them before you check out.
Receive the current Crafty Collaborations Tutorial Bundle FREE with a $75+ AUD order in my online store, or purchase it from me anywhere in the world for $28 AUD.
Sign up for my Newsletter to keep updated with the latest Stampin' Up!® news HERE and receive a free exclusive tutorial bundle from me.
Request a Stampin' Up!® catalogue from me in Australia on the link below.
Find all my Links HERE.
Thank you so much for stopping by my blog today.
Have a great day and Happy Crafting.
Love Mandy


Comments
Post a Comment
Thank you so much for your comment and for visiting my blog.