I love ducks. I have many lovely memories of visiting the ducks with my children when they were little, of watching the ducks along the banks of the Murray River in country Victoria and of my friend's pet duck when I was a child.
What better time than for a special birthday, to create a beautiful card featuring the amazing Lily Pond Lane Designer Series Paper. This split gate-fold card is a really easy design to create and can be created in any colours with any Designer Series Paper. All you need is a paper trimmer and scoring blade or tool. For the focal image, you can use any shape die, or even just cut a simple rectangle, then layer it with complimentary colour.

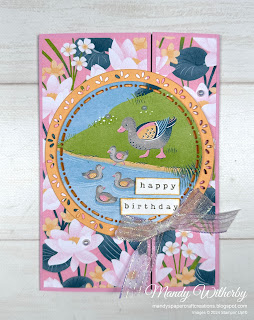
Split Gate-Fold Lily Pond Lane Card
Full product list for my card and direct shopping link can be found HERE.
Measurements
Card Base - Pretty In Pink Cardstock - 21cm x 14.85cm, scored and folded at 6.5cm from the left side and 4cm from the right side.
Layer - Lily Pond Lane Designer Series Paper (Pink Water Lillies)
- Left front panel 6.1cm x 14.45cm
- Right front panel 3.6cm x 14.45cm
Circle Frame - Peach Pie Cardstock - 10cm x 10cm, die cut largest circle from Spotlight on Nature Dies
Focal Image - Lily Pond Lane Designer Series Paper - Die cut scene with 2nd largest circle die
Layer - Peach Pie Cardstock - 9cm x 9cm - Die cut with 2nd largest circle die
Sentiment - Basic White Cardstock - 5.8cm x 1cm
Ribbon - Iridescent Striped Trim - 27cm
Insert - Basic White Cardstock - 10.1cm x 14.45cm
Insert Designer Series Paper Strip - 10.1cm x 1.5cm
Instructions
For my card I chose to feature one of the adorable duck scene papers from the Lily Pond Lane Designer Series Paper pack.
- The card base is created using Pretty in Pink Cardstock. See measurements below for creating the gate fold card base.
- For the gate-fold panels I chose the Pretty in Pink water lily paper from the Lily Pond Lane Designer Series Paper pack, which I adhered to the Pretty in Pink Cardstock card base.
- Using the Spotlight on Nature Dies, I die cut the scene using the second largest circle die.
- To give stability to the Designer Series Paper, I cut a second circle in the same size from Peach Pie Cardstock and adhered it to the back of the Designer Series Paper scene using Multipurpose Liquid Glue.
- Using Stampin' Dimensionals, I layered the scene onto a Peach Pie Cardstock circle, die cut with a largest circle from the Spotlight on Nature Dies.
- I adhered the largest circle to the front left side panel of the gate fold using Multipurpose Liquid Glue, ensuring that the glue did not extend beyond the edge of the panel.
- The sentiment from the Country Birdhouse Stamp Set was stamped in Gray Granite ink on Basic White Cardstock and trimmed, then inked around the edges with Peach Pie ink using a Sponge Dauber and adhered to the scene with Mini Stampin' Dimensionals.
- The bow it attached to the Peach Pie circle, below the sentiment, using a Mini Glue Dot.
- I completed my card by embellishing with five Iridescent Pearl Basic Jewels.
If you would like to see how I created this card, you can click on video below.
I hope my project has inspired you in your creativity and encouraged you to consider playing with the Lily Pond Lane Designer Series Paper. 
Split Gate-Fold Lily Pond Lane Card
*** When shopping with me, remember to use my current Host Code when your order is over $75 AUD, to receive a thank you gift from me. You will find my current Host Code at the top right side of my blog page.
AUGUST 2024 Host Code is SVQ3XTP2
If your order is over $250 AUD, don't use the Host Code, as you will receive Stampin’ Rewards from Stampin' Up!®. Be sure to claim them before you check out.
Receive the current Crafty Collaborations Tutorial Bundle FREE with a $75+ AUD order in my online store, or purchase it from me anywhere in the world for $28 AUD.
Sign up for my Newsletter to keep updated with the latest Stampin' Up!® news HERE and receive a free exclusive tutorial bundle from me.
Request a Stampin' Up!® catalogue from me in Australia HERE.
Find all my Links HERE.
Thank you so much for stopping by my blog today.
Have a great day and Happy Crafting.
Love Mandy


Comments
Post a Comment
Thank you so much for your comment and for visiting my blog.