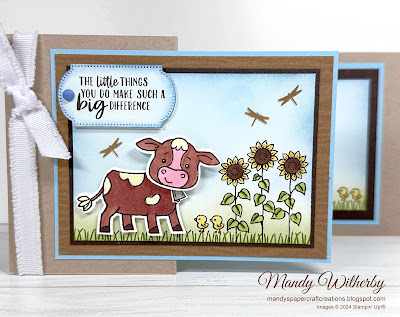
Oh my goodness, I love cows. They are so sweet and this Cutest Cows Stamp Set is just so adorable, that I just had to create a cute scene card!
There are so many different cows that you can create, by interchanging the three different bodies with the three different faces and by also incorporating the coordinating Cutest Cows Builder Punch for even more alternatives.
In the stamp set there are also flowers, chickens, a milk can, grass, alternate faces (for use with the punch) and of course many fun sentiments. This stamp set is a super fun one!
For my card today I created a simple Z-Fold fun-fold card with an adorable scene. By adding some simple cardstock and Designer Series Paper layers, it framed the scene beautifully.
 |
| Cutest Cows Fun Fold Card |
Full product list for my card and direct shopping link can be found HERE.
Measurements
Card Base - Crumb Cake Cardstock - 10.5cm x 29.7cm, scored and folded at 14.85cm & 7.4cm
Layer - Balmy Blue Cardstock - 12.2cm x 9.2cm
Layer - To Market Designer Series Paper Woodgrain - 11.8cm x 8.8cm
Layer - Early Espresso Cardstock - 10.8cm x 7.8cm
Card Front - Basic White Cardstock - 10.4cm x 7.4cm
Sentiment tag - Basic White Cardstock - 4cm x 8cm
Stamped cow - Basic White Cardstock - 7cm x 10cm
Card Insert - Balmy Blue Cardstock - 12.2cm x 9.2cm
- Early Espresso Cardstock - 11.6cm x 8.6cm
- Basic White Cardstock - 10.4cm x 7.4cm
Ribbon - 35cm
Instructions
I started by stamping the sunflowers in Early Espresso ink onto Basic White Cardstock, then the grass in Old Olive ink, before stamping the chicks in Early Espresso ink. I then coloured the stamped images using Stampin' Blends. To colour the background I used Blending Brushes with Old Olive ink for the grass and Balmy Blue for the sky with and a touch of Misty Moonlight ink around the edges of the sky.
I stamped the cow body, head and bell onto a piece of 7cm x 10cm Basic White Cardstock using Early Espresso ink, allowing space to punch out the head and body separately. I coloured the cow with Copper Clay, Ivory, Pretty in Pink and SU 200 (Deep Combo) Stampin' Blends. The Bell was coloured with light Smoky Slate Stampin' Blends and fussy cut with Paper Snips scissors. I then used the Cutest Cows Builder Punch to punch out the cow head and body. I attached the cow head to the body with a Mini Stampin' Dimensional and adhered the cow to the card with Stampin' Dimensionals to make her really pop off the card. I added the bell under the cow's chin with a small dab of Multipurpose Liquid Glue.
For the sentiment label, I stamped the sentiment from the Cutest Cows Stamp Set in Early Espresso Ink onto Basic White Cardstock. I die cut the label shape using the Greetings of the Season Dies. I then used Balmy Blue ink with a Blending Brush to colour the label and added some Misty Moonlight ink around the edges with the Blending Brush.
To embellish the card, I added three gold dragonflies from the Adhesive-Backed Dragonflies & Birds to the scene and a blue Ombre Matt Decorative Dot to conceal the die cut hole in the label.
I wrapped 35cm of White Frayed Grosgrain Ribbon around the left side of the front panel and tied in a knot. I added a Mini Glue dot under the knot and one under the reverse side of the panel to secure the ribbon in place.
For the insert I stamped the grass along the bottom of the white insert piece, then two chicks on the bottom right-hand side, which I coloured with Stampin' Blends. I then used the Old Olive, Balmy Blue and Misty Moonlight inks with the Blending Brushes to create the grass and sky, as on the card front. I then layered this with Early Espresso and Balmy Blue Cardstock and centred these panels on the inside of the card.
If you would like to see how I created this card, you can click on my video below.
I hope my project has inspired you in your creativity and encouraged you to consider playing with the Cutest Cow Stamp Set and Builder Punch.
*** When shopping with me, remember to use my current Host Code when your order is over $75 AUD, to receive a thank you gift from me. You will find my current Host Code at the top right side of my blog page.
JULY 2024 Host Code is EFQGM4BH
If your order is over $250 AUD, don't use the Host Code, as you will receive Stampin’ Rewards from Stampin' Up!®. Be sure to claim them before you check out.
Receive the current Crafty Collaborations Tutorial Bundle FREE with a $75+ AUD order in my online store, or purchase it from me anywhere in the world for $28 AUD.
Sign up for my Newsletter to keep updated with the latest Stampin' Up!® news HERE and receive a free exclusive tutorial bundle from me.
Request a Stampin' Up!® catalogue from me in Australia HERE.
Find all my Links HERE.
Thank you so much for stopping by my blog today.
Have a great day and Happy Crafting.
Love Mandy

.jpeg)


Comments
Post a Comment
Thank you so much for your comment and for visiting my blog.