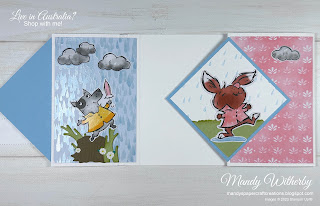
I've been having so much fun in my craftroom this week, playing with the Rain or Shine suite.
On my Thursday Live Creative Time, I created a really cute Diamond Gate Fold Card, complete with four separate scenes, one on each panel.
 |
| Rain or Shine Diamond Gate Fold Card - front |
There are many different types are gate fold cards, but the base of this one is pretty easy to create. It looks more complicated than it actually is.
Measurements
Card Base - Basic White Thick cardstock, 28cm x 10.5cm, scored and folded at 7cm from each end.
Layer - Rain or Shine Designer Series Paper, 6.5cm x 10cm - Cut 4 pieces.
Layer - Balmy Blue cardstock, 7cm x 7cm - Cut 2 pieces.
Layer - Thick Basic White cardstock, 6.5cm x 6.5cm - Cut 2 pieces.
Grass Layers - Pear Pizzazz cardstock, 4cm x 4cm - Cut 1 piece and tear in half on the diagonal.
Sentiment Label - Basic White Thick cardstock - 6cm x 3cm
Die cut grass - Pear Pizzazz cardstock, 9cm x 3.5cm, die cut 3 pieces with Playing in the Rain Dies.
Tree stump and Bridge - Soft Suede cardstock - 13cm x 3.5cm, die cut with Playing in the Rain Dies.
- Start with a piece of Thick Basic White Cardstock which measures 28cm x 10.5cm. Score 7cm from each end. Fold the two ends in to meet in the middle and burnish the folds with a Bone Folder.
- Cut four pieces of Rain or Shine Designer Series Paper 6.5cm x 10cm.
- Adhere the Designer Series Paper to the two front outside panels first.
- Wrap Crinkle Seam Binding Ribbon around the front left side panel and tie a bow towards the top.
- Adhere the Designer Series Paper to the two inside side panels. The left side piece will cover the ribbon on the inside.
- Cut two squares of Balmy Blue Cardstock, 7cm x 7cm.
- Cut two squares of Thick Basic White, 6.5cm x 6.5cm.
- Turn the white squares on a diagonal to form a diamond shape, so that there is a point at the top and bottom. Stamp rain drops on the two Basic White diamonds, using stamped-off Balmy Blue ink and Playing in the Rain stamp set.
- To create grass for front two panels, take a piece of Pear Pizzazz measuring 4cm x 4cm and tear it across the diagonal. Flip over the second piece so that the torn edge is at the front. Ink the torn edge of each piece with Pear Pizzazz ink and a Sponge Dauber. Adhere a Pear Pizzazz piece to bottom edge of each white diamond.
- Adhere a Baisic White stamped piece to each square piece of Balmy Blue cardstock
- Open up the left side front panel, keeping the right side closed. Have your squares in a diamond shape orientation (rain drops in the correct orientation) and adhere one of the stamped diamonds to the front of the right front panel, ensuring your glue does not extend beyond the inside edge of the front panel. (See tips in video).
- Close the left front panel over the right diamond. Adhere the other stamped white diamond to the left panel ensuring it aligns and covers the right side diamond. Again ensuring that glue does not extend beyond the front left panel of the card.
- Decorate each panel as desired using die cut and fussy cut pieces from the Rain or Shine Designer Series Paper and Playing in the Rain Dies. Be careful not to add to much dimension to the inside panels as it will make it difficult to close the card. You can however add dimension to the outside left panel.
- Stamp a greeting with the Playing in the Rain Stamp Set and die cut with the Stylish Shapes Dies labels. Add this to the front panel of your card, using Dimensionals.
 |
| Rain or Shine Diamond Gate Fold Card - Front |
 |
| Rain or Shine Diamond Gate Fold Card - left side opened |
 |
| Rain or Shine Diamond Gate Fold Card - Close up of front right panel |
 |
| Rain or Shine Diamond Gate Fold Card - Close up of inside right panel |
 |
| Rain or Shine Diamond Gate Fold Card - card fully opened Centre panel can be left white for writing message, or add additional layers if desired. |
 |
| Rain or Shine Diamond Gate Fold Card - close up of inside right panel |
Full product list for my card and direct shopping link can be found HERE.
I hope my project has inspired you in your creativity and encouraged you to consider playing with the Rain or Shine Suite products to create a Diamond Gate Fold Card of your own.
*** When shopping with me, remember to use my current Host Code when your order is over $75 AUD, to receive a thank you gift from me. You will find my current Host Code at the top right side of my blog page. March 2023 Host Code is EDTYUZRQ
If your order is over $250 AUD, don't use the Host Code, as you will receive Stampin’ Rewards from Stampin' Up!®. Be sure to claim them before you check out.
Receive the March Tutorial Bundle FREE with a $75+ AUD order in my online store, or purchase it from me anywhere in the world for $28 AUD.
Sign up for my Newsletter to keep updated HERE and receive a free exclusive tutorial bundle.
Request a Stampin' Up!® catalogue from me in Australia HERE.
Thank you so much for stopping by my blog today.
Have a great day and Happy Crafting.
Love Mandy


Comments
Post a Comment
Thank you so much for your comment and for visiting my blog.